Help:Uploading images step-by-step: Difference between revisions
No edit summary |
|||
| Line 1: | Line 1: | ||
== Here is a step-by-step guide to uploading an image file == | == Here is a step-by-step guide to uploading an image file == | ||
<br><br><br> | |||
=== Click on the ''Upload File'' link on the sidebar. === | === Click on the ''Upload File'' link on the sidebar. === | ||
This will bring you to the ''upload file page''. <br> | |||
[[File:Uploading images step by step - 01 - upload file link.png|500px]] | |||
<br><br><br> | |||
=== In the ''upload file page'', click on "browse" === | === In the ''upload file page'', click on "browse" === | ||
This will open up a file browser to select your desired image. <br> | |||
[[File:Uploading images step by step - 02 - upload file page.png|1000px]] | |||
<br><br><br> | |||
=== Give the file a very unique and descriptive file name, fill in a summary of the image, and hit the ''Upload File'' button. === | === Give the file a very unique and descriptive file name, fill in a summary of the image, and hit the ''Upload File'' button. === | ||
You will want the name to be unique, as many users may be uploading similar images. So, "AngharadDrakenhefdArms.gif" is unique, "MyArms.gif" is not. <br> | |||
Optionally, fill in a description of the image in the summary to help folks understand what the image is. <br> | |||
Finally, when ready, hit the ''Upload File'' button at the bottom to upload the file you've selected. <br> | |||
[[File:Uploading images step by step - 03 - upload file with image.png|1000px]] | |||
<br><br><br> | |||
=== Take note of the full file name in the resultant image page. === | |||
This will include the "File:" or "Image:" portion of the name. <br> | |||
In this example, it's "File:AngharadDrakenhefdArms.gif" <br> | |||
[[File:Uploading images step by step - 04 - File image page.png|300px]] | |||
<br><br><br> | |||
=== Use the full file name inside double square brackets on the desired wiki page === | |||
There are many image options available that you can use, separated by a vertical pipe "|" character. <br> | |||
You can find examples of those options [[Help:Formating_images|here]] <br> | |||
[[File:Uploading images step by step - 05 - File image code.png|1500px]] | |||
<br><br><br> | |||
=== Example of the final image in use === | |||
In this case, the image has a frame option, an alignment option, and a caption that gives the blazon of the arms. <br> | |||
[[File:Uploading images step by step - 06 - File image on page.png|500px]] | |||
Latest revision as of 07:53, 23 February 2025
Here is a step-by-step guide to uploading an image file
Click on the Upload File link on the sidebar.
This will bring you to the upload file page.

In the upload file page, click on "browse"
This will open up a file browser to select your desired image.

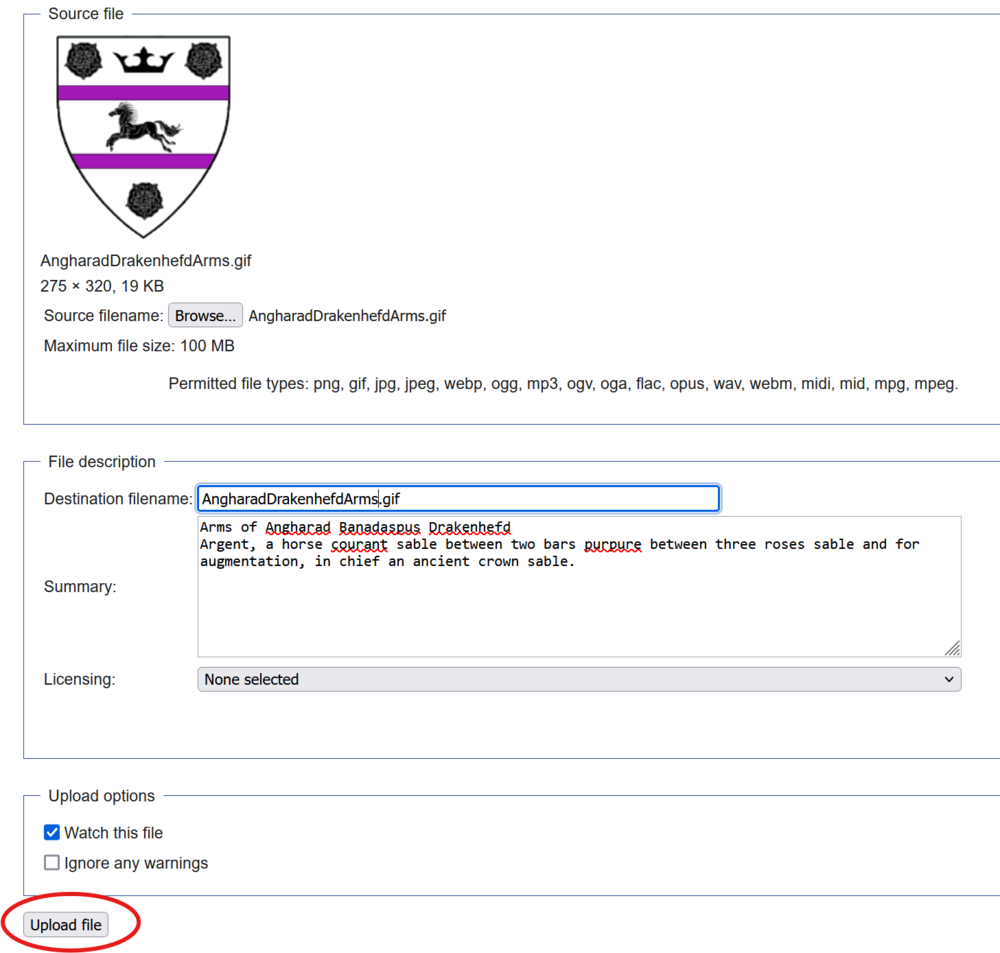
Give the file a very unique and descriptive file name, fill in a summary of the image, and hit the Upload File button.
You will want the name to be unique, as many users may be uploading similar images. So, "AngharadDrakenhefdArms.gif" is unique, "MyArms.gif" is not.
Optionally, fill in a description of the image in the summary to help folks understand what the image is.
Finally, when ready, hit the Upload File button at the bottom to upload the file you've selected.

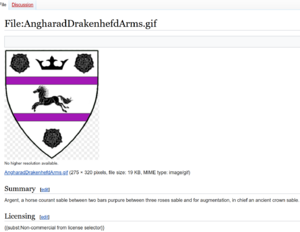
Take note of the full file name in the resultant image page.
This will include the "File:" or "Image:" portion of the name.
In this example, it's "File:AngharadDrakenhefdArms.gif"

Use the full file name inside double square brackets on the desired wiki page
There are many image options available that you can use, separated by a vertical pipe "|" character.
You can find examples of those options here

Example of the final image in use
In this case, the image has a frame option, an alignment option, and a caption that gives the blazon of the arms.
